Discussion of TABC-related matters
-
Herman 5560
- Posts: 185
- Joined: Thu Apr 16, 2015 3:31 am
- Location: Port Elizabeth SA
Post
by Herman 5560 » Fri Apr 21, 2017 8:22 pm
Morning everybody from what appears is going to be a sunny autumn day here in SA.
As I showed in a previous post my cable cover is all scew, the holes in the tabs also did not line up to the holes in the scuttle.
I have cut off the tabs and ground the cover's base flat.
Now I have to weld the tabs on in the correct position...
What is the correct position of the cover

Does it line up to the folded piece of metal or to the front...so the RED line or the YELLOW line?
-
Attachments
-

-
Herman 5560
- Posts: 185
- Joined: Thu Apr 16, 2015 3:31 am
- Location: Port Elizabeth SA
Post
by Herman 5560 » Fri Apr 21, 2017 11:59 pm

And I did page through the BOOK before I posted.

-
Attachments
-
- Cable cover P240.JPG (13.85 KiB) Viewed 8462 times
-
Herman 5560
- Posts: 185
- Joined: Thu Apr 16, 2015 3:31 am
- Location: Port Elizabeth SA
Post
by Herman 5560 » Thu Apr 27, 2017 5:33 am
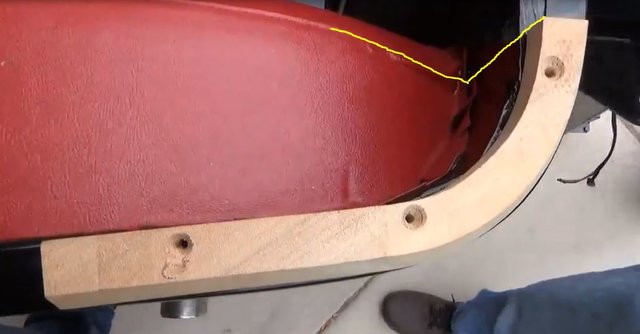
Does the trip strip line up with the seam of the wheel arch cover?
-
Attachments
-
-
cdrolshagen
- Posts: 101
- Joined: Tue Dec 29, 2015 1:30 am
- Location: Soerup Germany
Post
by cdrolshagen » Thu Apr 27, 2017 6:24 am
Hi,
the original TC rail is 36 Inches long,
greetings fron nothern Germany - we have a very cold spring
Carl
-
Attachments
-

-
Herman 5560
- Posts: 185
- Joined: Thu Apr 16, 2015 3:31 am
- Location: Port Elizabeth SA
Post
by Herman 5560 » Thu Apr 27, 2017 8:56 am
What is the actual cross section? About 20 x 20 mm
-
Herman 5560
- Posts: 185
- Joined: Thu Apr 16, 2015 3:31 am
- Location: Port Elizabeth SA
Post
by Herman 5560 » Fri Apr 28, 2017 12:42 am
Can anybody help with a nice perpendicular photo and something like a tape measure in the same photo to refrence to for the seat adjusters goung on the rear wheel arches. Mine is made of some angle iron.
Need to fabricate new ones.
-
Attachments
-
- images(1).jpg (2.46 KiB) Viewed 8434 times
-
Herman 5560
- Posts: 185
- Joined: Thu Apr 16, 2015 3:31 am
- Location: Port Elizabeth SA
Post
by Herman 5560 » Sat Apr 29, 2017 9:07 pm
Posting info I get just in case somebody at a later stage needs it as well.
And my way to thanks the people taking the time to go and measure their cars or go and scratch in their archives from when they rebuilt their cars.


Here are the dimensions for the cover strip that goes on to of the tub. I added the metric conversion as I usually print this out and take it to the garage. Still have to set up one of my old laptops in the garage.
-
Attachments
-

-
Herman 5560
- Posts: 185
- Joined: Thu Apr 16, 2015 3:31 am
- Location: Port Elizabeth SA
Post
by Herman 5560 » Sat Apr 29, 2017 9:47 pm
Set up my car to measure the 36" (914mm) for the middle piece of the cover strip for the rear tub.
Found a bit of a disturbing fact. My rear panel has a 12mm bow in it. I have watched Dough's Youtube video 100 times and he also used a perfectly straight piece of wood for the center piece.
Perhaps this is relevant for Steve that is busy with his tub. So sizes I have taken off mine could be way out.
Any comment from somebody else?
-
Attachments
-

-
Duncan M
- Posts: 792
- Joined: Fri Oct 10, 2014 9:08 pm
- Location: Northern California
Post
by Duncan M » Sat Apr 29, 2017 11:47 pm
Herman-
TC9866 has all original wood and covering back there, and the back piece definitely is not flat in back. It conforms to the steel body shape. I cannot tell if it was bent to fit or if back was sanded to conform, as my canvas top is installed. Mine is 35 7/8" between the outer pieces.
The vertical uprights for the seat adjusters have 36 3/8" space between them. The seams mostly do not come close to lining up, and are a good 1 1/4" (each side) inside from the seat adjuster uprights. The seams on mine are anything but straight; quite irregular. I imagine the seams started out straight, but got irregular on install.
Last edited by
Duncan M on Sun Apr 30, 2017 8:59 am, edited 1 time in total.
-
Herman 5560
- Posts: 185
- Joined: Thu Apr 16, 2015 3:31 am
- Location: Port Elizabeth SA
Post
by Herman 5560 » Sun Apr 30, 2017 12:58 am

Makes me feel better. I will glue up some of my left over floor ply to get as close as possible to the 16mm thickness and just cut to the same curve of the back panel, was just worried I led Steve up the garden path.

-
Herman 5560
- Posts: 185
- Joined: Thu Apr 16, 2015 3:31 am
- Location: Port Elizabeth SA
-
SteveW
- Posts: 314
- Joined: Sun Aug 23, 2015 8:25 am
- Location: Nottingham, UK
Post
by SteveW » Tue May 02, 2017 9:19 am
[quote="Duncan M"]Herman-
TC9866 has all original wood and covering back there, and the back piece definitely is not flat in back. It conforms to the steel body shape. quote]
I think that you are talking at slightly crossed purposes here. The piece of wood that forms the back should definitely be straight, as should the plywood that its fitted to, but the outer face of it has curve cut into it at both ends that the metal quarter panels are then formed around. The edge that Herman shows to be curved by 12mm at the centre should be straight (see TC Forever for the dimensions).
Herman - thanks for the measurements that you took from your car. I have not used them in isolation as I now have measurements from three separate sources. I'll do a post on my stage two build thread when I get a moment that either shows a graphic with my measurements, or gives a table with them in.
-
Herman 5560
- Posts: 185
- Joined: Thu Apr 16, 2015 3:31 am
- Location: Port Elizabeth SA
Post
by Herman 5560 » Sat May 13, 2017 12:56 am
Difficuilt day to get anything done today again.
SBK Race one on at 12:45 and F1 GP Qualifying on at 14:00 our time.
then wifie has also decided to have the kids over so I have to be "CLEAN and PACKED AWAY" by 17:00

Never leave a drill lying that somebody chucked out. This old drill was ditched, clearly the switch was agonner and a replacement switch is more than replacing the drill with a new Chinese import.
Couple of pieces of scrap wood and an old backing plate and I have myself a disc sander. Perfect for sanding the 60 Deg side of my trim strips.
-
Attachments
-

-

-
Herman 5560
- Posts: 185
- Joined: Thu Apr 16, 2015 3:31 am
- Location: Port Elizabeth SA
Post
by Herman 5560 » Sat May 13, 2017 7:09 am
Ducati won

Hamilton on Pole

And Rh trim piece complete.

-
Attachments
-

-
Herman 5560
- Posts: 185
- Joined: Thu Apr 16, 2015 3:31 am
- Location: Port Elizabeth SA
Post
by Herman 5560 » Fri Jun 30, 2017 7:20 am
Xmas father arrived while I was at work.
-
Attachments
-

-
Herman 5560
- Posts: 185
- Joined: Thu Apr 16, 2015 3:31 am
- Location: Port Elizabeth SA
Post
by Herman 5560 » Fri Jun 30, 2017 7:24 am
Complete red interior. No seat covers.
-
Attachments
-

-
Herman 5560
- Posts: 185
- Joined: Thu Apr 16, 2015 3:31 am
- Location: Port Elizabeth SA
Post
by Herman 5560 » Fri Jun 30, 2017 7:26 am
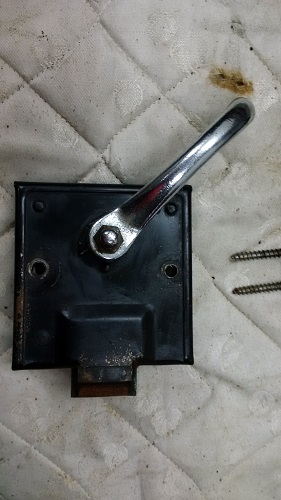
The old and the new
-
Attachments
-
- Door lock 1.jpg (104.07 KiB) Viewed 8160 times
-

-
Herman 5560
- Posts: 185
- Joined: Thu Apr 16, 2015 3:31 am
- Location: Port Elizabeth SA
Post
by Herman 5560 » Sat Mar 09, 2019 7:22 am
Will continue my rebuild in this post.
Refer to the Rad Brace which way round as also part of my rebuild.
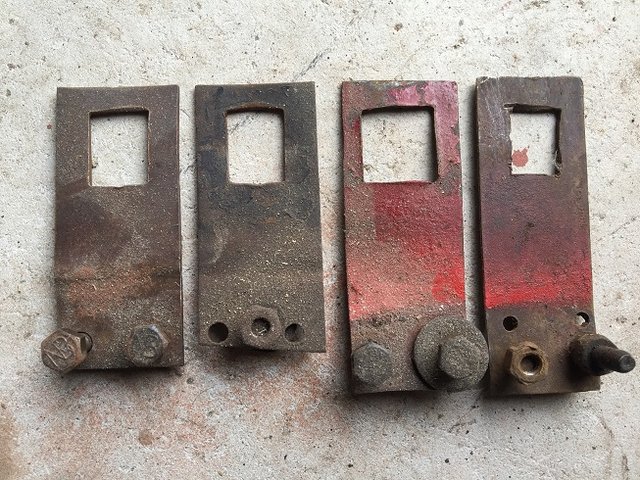
Can anybody help with some dimensions of these bonnet striker brackets. As can be seen mine is very crudely made and I am sure far from standard.
-
Attachments
-
-
Herman 5560
- Posts: 185
- Joined: Thu Apr 16, 2015 3:31 am
- Location: Port Elizabeth SA
Post
by Herman 5560 » Sun Mar 10, 2019 1:19 am
Can not believe somebody has enough time to spray a door and not enough time to remove or tape the door handles.

Just checking as I have no nice close up pics and in the catalogs I do not see any gasket between the door handle and the door.

Does it need one?
