by Philip W. May
Work on the rear axles of my ’48 TC required replacinga the worn oil thrower bushing. I had never done this before.
I went to the T-ABC website and found two “solutions” posted. One, reprinted from the February 1998 issue of Octagon Topics Vintage MG Club of Southern California, obviously involves inserting some parts from the differential side of the axle tube. . You can’t get the require pieces shown through the old bushing so they have to come, somehow, from inside an empty differential housing. Overkill. Not for me.
The second method sounded interesting and involved simply pushing the old bushing inward towards the differential when inserting the new bushing. However, after removing my old bushings with the tool I will describe here, I realized the tube area where bushings go is not very long. The old bushings, forced inward, would either drop into the enlarging outer tube, or would end up jangling around on the half shafts.
I devised a simple tool made of common parts I got at my local Ace Hardware store. It did take trial and error and three visits to the store for different size parts. It worked flawlessly as presented here. I didn’t save my receipts, but I think everything came to under $15.
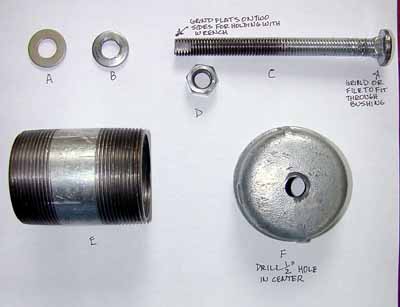
PARTS NEEDED SHOWN IN FIGURE 1.
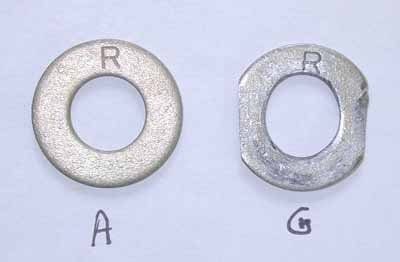
(Part A) Hardened washer app. 1-3/8 inches in diameter This washer will NOT pass through the bushing and is slightly larger in diameter than the inner diameter of the bushing. Take a new bushing with you to test this at your hardware store. The ones I bought had an “R” stamped on them and were a slightly gold anodized color.
(Part B) Reasonably thick plain steel washer of a size that WILL pass through the bushing. It should have a 1/2” hole. Drill to that size if necessary.
(Part C) App.5” long 1/2” carriage bolt The rounded cap probably will NOT fit through the bushing. Either file or grind down the circumference edges on a grinding wheel so it will fit through the bushing. (See note on Figure 1) Important to use carriage bolt, not plain hex-head bolt.
(Part D) Sturdy nut to fit carriage bolt.
(Part E) In plumbing section of the store get a piece of threaded plumbing pipe app. 3” long with a 2” diameter. That size is important also. Don’t get a smaller diameter piece.
(Part F) 2” diameter end cap.
PREPARATION:
Grind down two opposite sides of the hardened washer Part A to create Part G. (See Figure 3). Now it will slide through the bushing when tilted horizontally. Clamp the washer tightly in Vise Grip pliers or vise and use a round file or a 1/2” drill on your drill press or drill to make the center hole oblong as shown. This is so washer can cock or tilt on bolt.
With file or grinding wheel, grind flats on two sides of end of carriage bolt. (See note on Figure 1) This is for holding with a wrench when tool is in use, if necessary. Clean up threads with proper die if needed.
Find the app. center and drill 1/2” hole through top of end cap Part F. This is important to keep tool centered in use. Screw cap on pipe section a few turns.
On carriage bolt, slip small washer on first, then modified hardened washer.
The four flats on the carriage washer act to cock the two washers when tool is in use.
OPERATION:
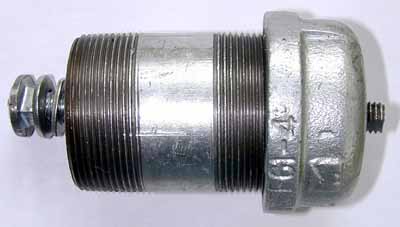
Insert the cap portion of carriage bolt with washers near cap into bushing. (See Figure 3) Tilt the hardened washer so it will go through. Then apply backward pressure by pulling on bolt. You should feel the two washers pressing on rear of bushing, but not coming through it because hardened washer will have straightened vertically.
Delicately slip pipe and end cap over end of carriage bolt and feed through the hole, as shown in Figure 3. Check backward pressure on bolt to rear of bushing. It should still be holding. Adjust if not.
Screw on the nut and hand tighten down to end cap. You will find the 2” diameter pipe will center nearly perfectly between four bolt heads on backing plate. (See Figure 4) Once you are sure you still have tight backpressure on washers, commence using wrench to tighten nut.

Inside the axle tube-- at the rear of bushing-- the hardened washer will either apply pressure on the bushing diameter, or it will slip inside the bushing, tilt and jam tightly into the interior of the bushing. The slow, steady tightening of the nut will then pull the bushing out. If the carriage bolt should begin to turn, use an adjustable wrench on the two flats you ground on the end of the carriage bolt. If, after pulling one bushing, the hardened washer has distorted, straighten it out in vise and re-use.
This crude-looking device gently pulled two bushings for me with no damage to the axle tunnel.