
TC Body Assemble Sequence?
-
loustaller

- Posts: 87
- Joined: Fri Jul 21, 2017 7:51 pm
TC Body Assemble Sequence?
I'm getting ready to do a final assemble of all the body panels before I take it apart for paint. What is the recommended sequence of assemble? Start with the radiator shell and work towards the rear of the car loosely installing all body panels so they can be moved and tweaked for the best fit? Thanks, Lou
-
frenchblatter
- Posts: 625
- Joined: Wed Apr 01, 2015 1:22 pm
- Location: Royston, South Yorkshire
- Contact:
Re: TC Body Assemble Sequence?
That's what I did. However, you'll probably find they have to come off and back on again many times  Good luck
Lynne & Norman Verona.
Our website
Visit our website to see what this idiot gets up to in his retirement
Our website
Visit our website to see what this idiot gets up to in his retirement
-
stephen stierman

- Posts: 447
- Joined: Mon Jan 07, 2013 6:12 pm
- Location: worthington, ohio USA
Re: TC Body Assemble Sequence?
Norman is correct. I also found that it was best with the running gear in the chassis and the car sitting on four wheels as it normally would.
Re: TC Body Assemble Sequence?
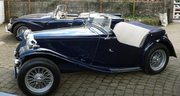
The radiator and shell have minimal scope for position adjustment so you're right to start reassembly with them. Then if you have the tub and scuttle assembled, mount them to the chassis (with the engine and transmission installed and the car on its wheels as Stephen suggests). With the radiator shell webbing and the rear bonnet rest rubber fitted, assemble the bonnet (hood) sides and top panels and fit both to the car with the chrome centre hinge. Only fit the chrome hinge brackets loosely at this stage (don't screw the bracket to the tub woodwork yet). There are two critical alignments to get right before assembling more.
1. the side hinge lines of the bonnet should align perfectly with the edge of the cowl (scuttle top), arrowed red....and
2. the front and rear edges of the bonnet panels should be close to and parallel with the radiator shell and the tub, arrowed blue.
Note in the picture there is still some correction to the hinge line to be made. I had trouble getting this right as the scuttle rubber I got from Moss was too thick. A replacement from Brown & Gammons sorted the problem.
If the alignment of the bonnet side panels isn't parallel you have either to raise the radiator shell or pack the tub up off the chassis . Likewise if the top bonnet panels aren't parallel, the position of the hinge brackets may need some lateral adjustment(unless you're prepared to trim the bonnet panels).
Once you're happy with these fits there is enough adjustment in the rest of the bodywork to let you produce a visually good result.
Re: TC Body Assemble Sequence?
I found that my bonnet was longer one side than the other and the scuttle top corners were also different. Also my new body tub would not fit on the chassis without widening the elongated holes in the front of the irons. There have been many problems not least with the rear wings. Nightmare!
There might be something not quite straight with the chassis but it is only small and I can't find it. You don't need much to throw the whole thing out!
There might be something not quite straight with the chassis but it is only small and I can't find it. You don't need much to throw the whole thing out!
Re: TC Body Assemble Sequence?
Will watch this topic with interest. Just got to the fitting wings etc. stage. So far happy. Ray who did you get your tub from? My from Hutsons is perfect apart from the pilot holes where the prop guard tunnel is bolted at the rear. They were out of line but then I`ve a 5 speed conversion so that may be the cause. Infact the 5 speed has also needed some "modification" to the rubber gearbox cover as it did not fit correctly over the new gearbox mountings.
-
loustaller
- Posts: 87
- Joined: Fri Jul 21, 2017 7:51 pm
Re: TC Body Assemble Sequence?
Thanks so much for all the replies. I started by bolting the radiator and shell to the chassis and plan on bolting the cowl and foot panel to the tub then bolting it loosely to the chassis. I've followed this sequence on a TF I did a few years ago and remember it not being as difficult as it was time consuming and a test of my patience. So I'll get my head in the right place and approach it with the expectations of it taking quite a while. But when I'm done I'm sure I'll be pleased with the results.
Re: TC Body Assemble Sequence?
One question I need answered is what gap should I expect or accept between the end of the running board and the rear wing of my 48 TC. New tub but original running boards and rear wings.
Re: TC Body Assemble Sequence?
Something I find strange is the bush between the tank and rear wing is faced on one side by a metal "washer". However when removed I did not note which side the metal washer goes. Against the tank panel or against the wing. Advice please.
Re: TC Body Assemble Sequence?
I bought my tub from Andy Denton (MG Ash Frames).jddevel wrote: ↑Fri Apr 08, 2022 5:09 amWill watch this topic with interest. Just got to the fitting wings etc. stage. So far happy. Ray who did you get your tub from? My from Hutsons is perfect apart from the pilot holes where the prop guard tunnel is bolted at the rear. They were out of line but then I`ve a 5 speed conversion so that may be the cause. Infact the 5 speed has also needed some "modification" to the rubber gearbox cover as it did not fit correctly over the new gearbox mountings.
How did you alter the rubber gearbox cover to get it to fit the 5 speed box mountings?
I have the same problem and not too sure where best to cut ?
Re: TC Body Assemble Sequence?
Cut a vertical triangular piece around the mounting area plus a vertical cut to one side. Triangular section in conjunction with the other vertical cut allowed for the rubber to be moved to expose the mounting. I then cut some other rubber I had and have currently fixed all together with gaffa tape. Will later make a more permanent arrangement of fixing all in place using a rubber or similar glue.
Re: TC Body Assemble Sequence?
I am wondering if I could stretch the rubber over the mounting by carefully heating the area with a hot air gun?
Re: TC Body Assemble Sequence?
Ray, Heating is certainly worth a try which I didn`t think of. One point I feel is that as the gearbox obviously has a certain amount of movement during driving that to ensure a suitable gap and not to deform the cover adding something rather than "stretching" may also work. To late for me as that`s what I`ve done. On reflection I may mould something out of fibreglass which I may be able to finish better. On another point as I`ve fitted a removable fitting in the top of the cover in order to both check levels and fill when necessary I`ve not as Hi-Gear suggested made a place covering the drain plug. I can still access that from under the car for draining etc.
Re: TC Body panel fitting
Although I`ve raised this under another topic which although it has had a number of views I`ve yet to get a response I`ve started a new topic. So advice need is two things 1) what is an acceptable gap between the running board and the rear wheel arches/fenders on a TC. It`s a new tub but original running boards and arches. 2) the original bush between the rear wheel arch and petrol tank has a metal washer on one side. I failed to note on removing which side the metal washer went.
Re: TC Body Assemble Sequence?
This thread might give you some clues on running board to rear wing clearance.
My car had both new running boards and new wings and the profile of the wing doesn't match that of the end of the board. The gap inboard at the tub is ¾" but grows to 2½" at the outer edges.
I didn't attempt to improve the fit. I imagine the profiles were a better match originally and a nominal gap of around ½" to ¾" was probably fairly standard.
My car had both new running boards and new wings and the profile of the wing doesn't match that of the end of the board. The gap inboard at the tub is ¾" but grows to 2½" at the outer edges.
Re: TC Body Assemble Sequence?
Decided on Steve Simmons view. Basically fit and forget and not spend hours trying to reduce the gap to a minimum.
Re: TC Body Assemble Sequence?
So happy with the panel fittings so far although not finally tightened up because need to fit the panel beading BUT have quite a gap between the inner edge of the outer wing where it meets the inner wing panel. Being an obvious "trap" for road debris and water, this is not ideal. Is this common and if so what steps have others taken to correct. To remind viewers it is a new tub which came with all new ready fitted panels.